I have always loved cooking in cast iron pans, at least in theory, if not in practice. Using cast iron is an easy way to be sure you’re avoiding cancer-causing, endocrine-disrupting PFAS “forever chemicals” that come with a lot of nonstick cookware,[1] an easy way to get added iron into your diet if your levels are low,[2] and, if you take proper care of them, you can probably avoid having to buy new pans for the rest of your life. Part of the problem is that many people who have and use cast iron pans (myself included) apparently don’t know everything there is to know about how to get the most out of them.
Seasoning
The most well-known aspect of cast iron pan use (at least among people I know) is the fact that they need to be seasoned before they’ll work well. Seasoning is not a difficult process, but it is a necessary one to ensure that you have a non-stick, rust-free surface when you cook. To season your pan, you need to make sure it is clean. Since you are about to season it, you can use soap (this time) if you need to, but hot water and a stiff brush will work to remove food particles.
Once the pan is completely dry, take a small amount of oil and buff it into the surface of the pan. “Small” is the key word here – it is better to err on the side of too little and season multiple times rather than using too much and try to get it done in one go. Since seasoning prevents rust, you can buff the outside of the pan with oil too. The oil you use doesn’t matter as long as it has a smoke point around or above 400F – that includes sunflower and safflower oils. Lard will go rancid if you aren’t using the pan frequently, so be aware of that too.
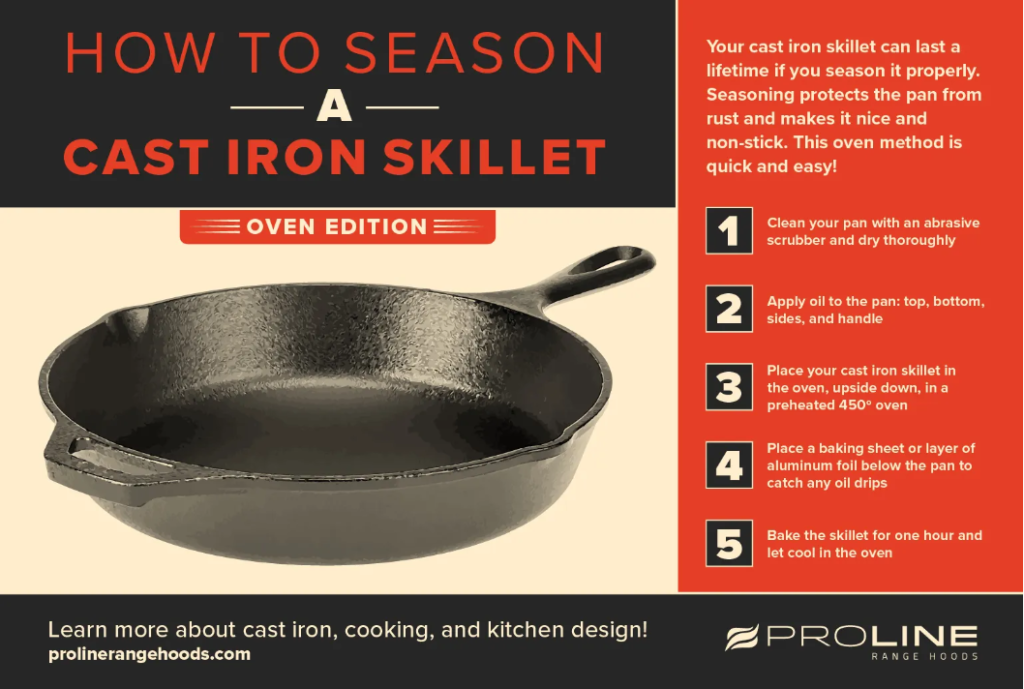
Image credit: [3]
Preheat your oven to at least 450F, but you may need to go higher if you’ve used an oil with a higher smoke point. The idea here is to create a chemical reaction that bonds the oil to the pan. In order to ensure that, look up the smoke point of your oil and go 25 degrees higher for this process. Ideally you should turn the pan upside down in the oven, with a tray or foil underneath to catch the excess oil, but it shouldn’t be a problem if you didn’t over-oil it. Leave the pan in the oven for an hour, let it cool for at least 15 minutes, and repeat if needed. (Some cooks do 2-3 rounds of seasoning.)[4]
Cooking
Depending on how and how often you use your pan, you may not need to reseason frequently because every time you cook (if you’re doing it correctly), you’re adding fat and heat, which contributes to the pan’s seasoning. At some point this spring (it could have been while watching a cooking tutorial on YouTube or listening to a cooking segment on NPR – I really can’t remember), I heard someone say that the key to nonstick cooking is the heat. And all of a sudden, I realized what I had been doing wrong for all these years.
I know I am not the only person who tosses ingredients into a pan before the pan is ready. Even if you’re not using a cast iron skillet, there are other reasons to follow the procedure of heating things up properly. For example, adding cooking oil to the pan after the pan is hot helps keep the oil from breaking down; adding garlic/onions to the oil after the oil is hot helps keep them from getting soggy. Nonetheless, I am frequently a repeat offender when the clock is ticking.
But if I’m worried about the clock, that’s exactly when I should be taking extra care to make sure I’m following the proper steps because that will save time in the long run. Preheating the pan, then adding your cooking oil/butter/fat, and waiting until everything is up to temperature will enable your ingredients to cook quickly on a smooth layer of hot oil, without seeping into the pores of the pan and getting stuck there. Since learning this fact, I have descended into a rabbit hole of YouTube tutorials and side-by-side comparisons of tricky ingredients, such as eggs.[5],[6]
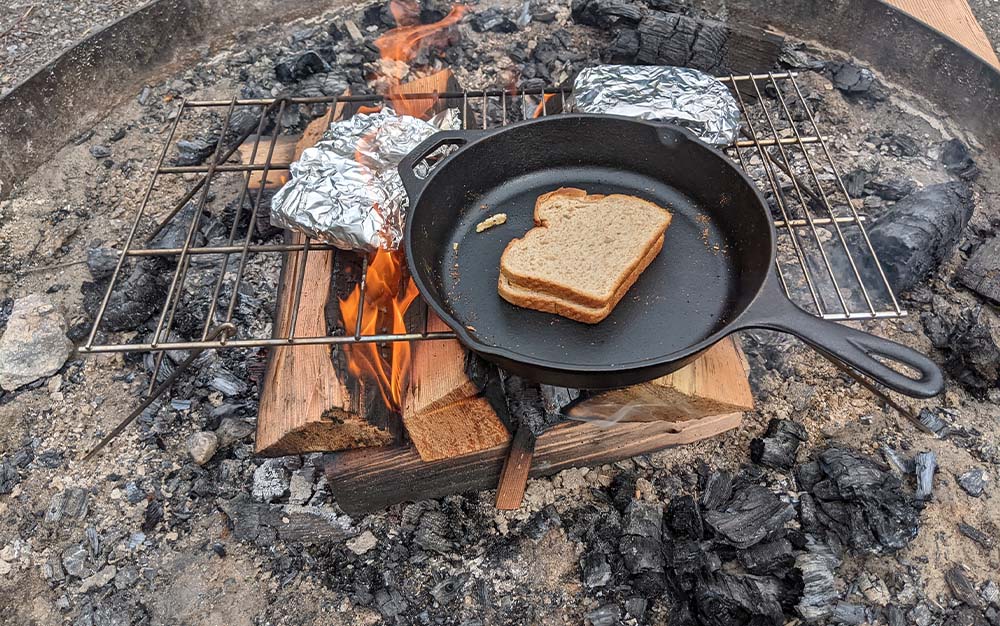
Image credit: [7]
Cleaning
Speaking of time, if you make less of a mess to start with, there is less to clean up. (Everyone who knows me personally is laughing hysterically after reading that sentence.) But it is at least true with cast iron. If you’ve got eggs baked into the surface of a poorly-seasoned pan, it’s going to take some scrubbing to get them out, which will further damage the seasoning on your pan. If, however, you’ve just got some food bits and excess oil, that can probably just come out by wiping with a paper towel. It is easiest to clean the pan while it’s still warm, so always try to do that quickly once you’re done using it.
When some scrubbing is necessary, you can try a couple of different methods. We have a salt-based cast iron scrub that I’ve never actually tried, but salt is abrasive enough to tackle baked-on food. We also have a small piece of chainmail and a stiff-bristled brush that get more frequent use. Whatever you use, it’s best to start by adding some water to the hot pan to loosen up the grease and food particles. If your pan is already cool, put it back on the burner. Dislodge the cooking residue and pour it out into a metal can, into a patch of weeds outside, anywhere but down the sink.[8]
If you find that you have to scrub and add water frequently, you probably want to reseason your pan on a more regular basis. At the very least, buff a little bit of oil back into it after it’s dry each time you rinse it. And remember not to wash it with soap unless you’re intending to completely strip it down and go through a full reseasoning process, with several rounds as described above. On the other hand, it’s also not good to leave large amounts of oil or fat in the pan between uses, either, as that can damage the pan over time too.[9] Just make sure you’ve got it cleaned out with a bit of a sheen to it when you’re putting it away.
Recipe: Brussels Sprout and Sweet Potato Hash
I’ve been trying to cook more seasonally these past few months since joining another CSA, and that means that I’ve been trying a lot of new recipes focused on what’s currently growing (since the carbon footprint of locally grown, out-of-season foods can be far higher than in-season foods trucked in from elsewhere).[10] Describing all of these new recipes to my mom made her mouth water, and she requested for her birthday that I cook some of them for her. And that’s exactly what I did last weekend, making use of my parents’ extensive cast iron pan supply.
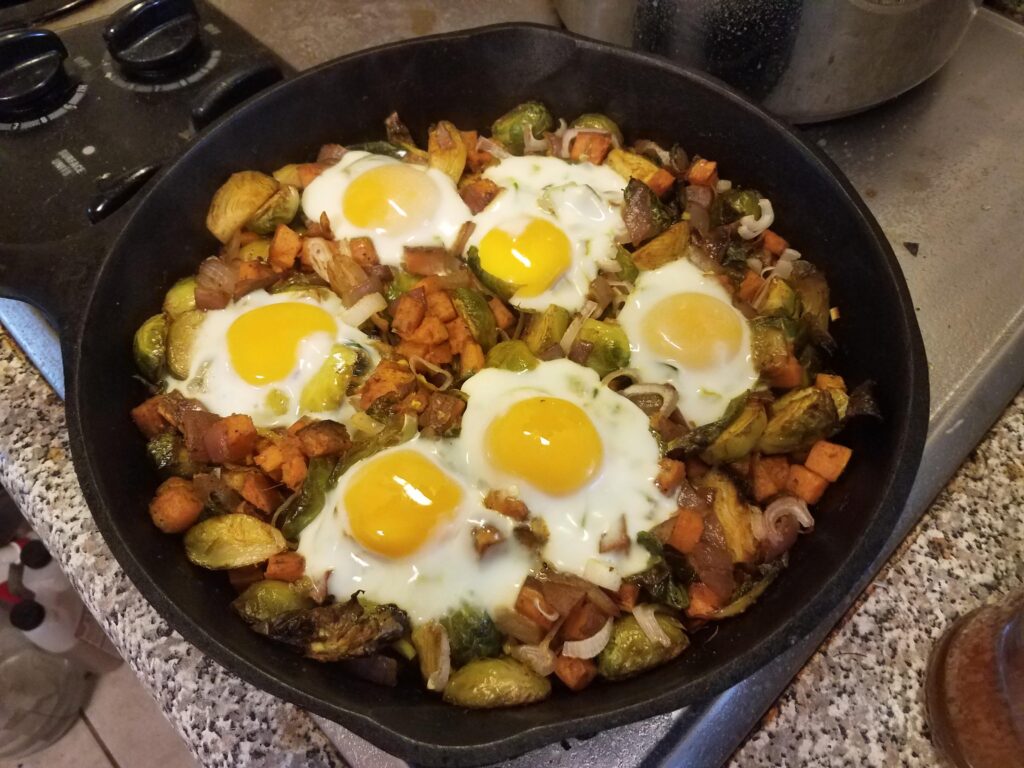
For breakfast, I made this sweet potato and Brussels sprout hash (one of my February recipes), modified from The Spruce Eats.[11] My first try with this recipe (at home) did not involve preheating the pan, and – as you might imagine – there was some sticking. However, when I made it for my parents last weekend, I added some oil to the pan, wiped it around with a paper towel to ensure all surfaces had a thin layer, then I left the pan to preheat in the oven while I was prepping the veggies. That made all the difference in the world, and everything after that was incredibly easy.
Quantities for this recipe are easily adjustable depending on how many people you have and how hungry they are – this recipe as written serves about 4-6. If you realize you’ve made far too much, you can also save the veggies and reheat them the next day with new eggs on top (if you like your eggs to be runny, which I do). You can also prep the hash ahead of time, and after looking up photos for this post, I’m wondering if I can modify it for a camping breakfast…
Ingredients :
- 1 lb sweet potato, cut into ¾-inch cubes
- 1 lb Brussels sprouts, trimmed and cut in half (or quarters if they’re very large)
- 1 onion, diced
- 1 bulb garlic, roughly chopped if the cloves are big (or whole, which I prefer)
- 2 Tbs olive oil
- Salt & pepper
- 1 tsp smoked paprika
- 1 tsp cumin
- ½ tsp cayenne (we use more)
- 6 eggs (or however many people want to eat)
Prepare cast iron pan with a thin layer of oil on all surfaces. Preheat oven to 425F with pan inside. Prepare sweet potatoes and toss with 1 Tbs oil, salt, and pepper before adding to cast iron pan. Roast for 15 minutes, stirring 2-3 times. Toss Brussels sprouts, onion, and garlic with 1 Tbs oil, paprika, cumin, cayenne, salt, and pepper. Add to the pan and roast for another 15 minutes, stirring 2-3 times.
Reduce oven to 400F and carefully crack eggs on top, spaced apart. (They stay put better if you make slight indentations for them first.) Bake for about 15 minutes until whites are set but yolks are runny. (You’ll need to pull the pan out and test the eggs with a knife because I have overshot the cook time and wound up with hard eggs both times – trust the texture, not the appearance.) Enjoy with your favorite hot sauce.
~
Are you a fan of cast iron cooking? What are your favorite tips or tricks? Did I get anything wrong? I am (clearly) still learning.
Thanks for reading!
[1] https://radicalmoderate.online/the-devil-we-know-and-dark-waters-teflon-in-the-media-part-1/
[2] https://pubmed.ncbi.nlm.nih.gov/12859709/
[3] https://www.prolinerangehoods.com/blog/how-to-season-cast-iron-skillet/
[4] https://www.delish.com/cooking/recipe-ideas/a32937364/how-to-season-a-cast-iron-pan/
[5] https://www.youtube.com/watch?v=q_WcI14A5fg
[6] https://www.youtube.com/watch?v=j6u_ChrWBQA
[7] https://www.outdoorlife.com/gear/best-camping-cookware-for-open-fires/
[8] https://www.youtube.com/watch?v=Rd731Y_xWLQ
[9] https://www.tastingtable.com/858885/is-it-possible-to-over-season-a-cast-iron-pan/
[10] https://radicalmoderate.online/community-supported-agriculture-part-1/
[11] https://www.thespruceeats.com/brussels-sprouts-and-sweet-potato-hash-4156790
2 Comments
Now You’re Cooking with Magnets! – Radical Moderate · August 3, 2025 at 12:27 pm
[…] cast iron – just because you can heat it quickly in turbo mode doesn’t mean you should. [17] We’re also aware that putting all four burners on at the highest setting will trip our circuit […]
Fast Food, Part 7 – Buddhism and China – Radical Moderate · March 29, 2026 at 7:12 pm
[…] use a wok (or a well-seasoned cast iron skillet [20] if you have an induction cooktop). Heat the pan over medium-low and transfer about 2 Tbs of the […]